|
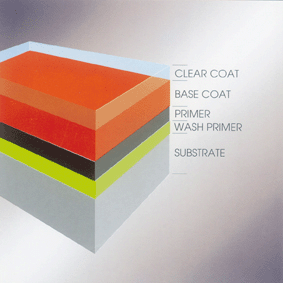
The steps involved in painting the car were straight forward. First the car’s interior was disassembled. This started with removal of all the leather seating and leather side panels. Next the windscreen, fenders, running boards, doors, hood, kerosene tank, and other components were removed. The car was now ready to have the paint removed. Mar-Hyde’s Tal-Strip II Aircraft Coating Remover was used to chemically remove the paint from all painted surfaces. The aluminum and steel body components were meticulously worked over to remove all dings, dents, and other imperfections. Several areas of the steel fenders required piecing in of replacement sheet-metal to cover badly rusted through areas. Other sections of aluminum, especially where the car had impacted a highway guide rail in the early 1990s, were filled with RAGE EVERGLASS® which is a multi-fiber reinforced body repair filler ideal for filling holes, rusted metal, body seams, and welds. After sanding additional coats of RAGE GOLD body filler were applied and sanded and finished off with Metal Glaze to insure a smooth surface. With the initial body work accomplished the complete car was lightly sanded and DuPont’s Premier Wash Primer (#1305 and 615) was applied. This is an acid etching primer that enhances adhesion retention through phosphate conversion and it contains a corrosion inhibitor. Next, to obtain a smooth surface DuPont’s Uro Prime (#1120 and #1140) filler/primer was used. This product has cross-linking chemistries to improve performance. With the primer applied additional body work was done to insure a smooth finish. Imperfections were treated with Metal Glaze/Final Glaze as necessary. Finally, after a complete light sanding and blocking the car was ready for the paint booth.
A Saima of North America Accudraft paint booth was used to apply the color coat of paint to the car. Use of the paint booth insures that any overspray is carried away from the surfaces being painted. The booth also provides proper lighting for painting as well as temperature control. Once the car was painted the booth can be heated and the paint cured more quickly. Prior to entering the paint booth the car required a complete taping and masking of all areas that were not intended to be painted. Once in the paint booth only the areas to be painted were left exposed. In the paint booth a coat of DuPont’s ChromaSystem Primer-Sealer #4940 was applied. After that dried three coats of Imron were applied. The first coat was allowed to sit for about 15 minutes and become tacky before a second coat was applied. This was allowed to dry tack up for 15 minutes when the final coat was applied. The final coat was a 50/50 ratio of color and clear coat to enhance gloss. The car was then baked for 40 minutes at 140 degrees Fahrenheit. Once the bake was complete the car’s finish needed to “rest” for a few days to allow time for the cross-linking chemistry of the IMRON paint system to occur in order that maximum durability could be achieved. IMRON is one of the few paint systems that can literally be sanded. After the paint cured the car’s body was lightly power and hand sanded with 2000-grit paper in selected areas. The sanding was done anywhere a tape line appeared in the finish. The objective of the sanding was to remove the “bump” that remained after painting where the edge of a strip of masking tape had been. After sanding 3M’s Imperial Microfinishing Compound (#06011) was applied with a wool pad applicator on a polisher/buffer. Following that the shine was further enhanced with 3M’s Finesse-it Finishing Material (#05928) again applied with a wool pad applicator on a polisher/buffer. The final step was a foam pad polishing using 3M’s Perfect-It Foam Polishing Pad Glaze (#05995). A hand applied and rubbed coating of Mothers California Gold® Natural Formula Pure Carnauba Wax completed the effort. |