|
The Model 735's interior restoration started with the careful removal of the existing interior. Extensive digital photos were taken to document the condition of the car. As each piece of the interior was removed it was photographed since it would be some time before the interior would be returning to the car.
The leather on the seats and side panels was definitely original however the leather used for the four door interiors had been replaced in 1952 (the leather of the passenger door had a data stamp). The seat leather and side panels had been repaired on several occasions. After eighty years of service there wasn't much life left and things were deteriorating quickly. It was also obvious in taking the interior apart that it had been previously removed during the 1950-1952 restoration. I was probably in good condition in 1950 and it was possible to make minor repairs to keep it serviceable.
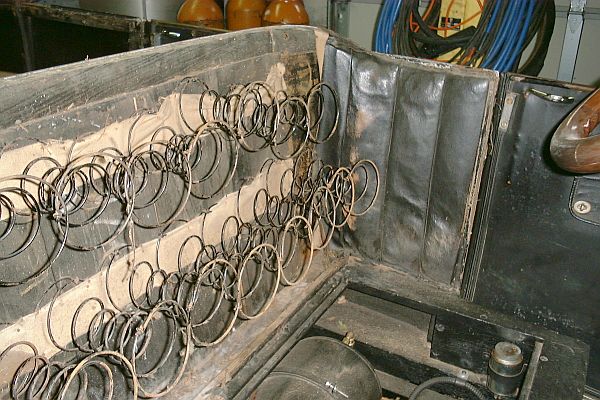
After removing what seemed like a million small tacks the front rear seat covering was able to be removed. The front seat was the only seat where the covering remained reasonably tacked in place. When the car was initially brought home it was cleaned of assorted nuts from the animals that had taken up residence. Not able to access the back of the front seat I had no idea that all of the space between the coil springs in the above photo was full of nesting materials. The seat back construction consisted of individual coil springs simply hung over a folded burlap cloth tacked to the wood back of the seat. Over the springs at one time had been felting held in place by duck cloth. The leather seat covering was then secured over the seat back using tacks in the seat frame. At the right of the picture is the leather side panel of the seat. These panels were filled with strips of 1/2" thick felt. Over the wooden framing a heavy piece of industrial cardboard was secured. The leather covering was tacked to the seat and body frame over the cardboard.
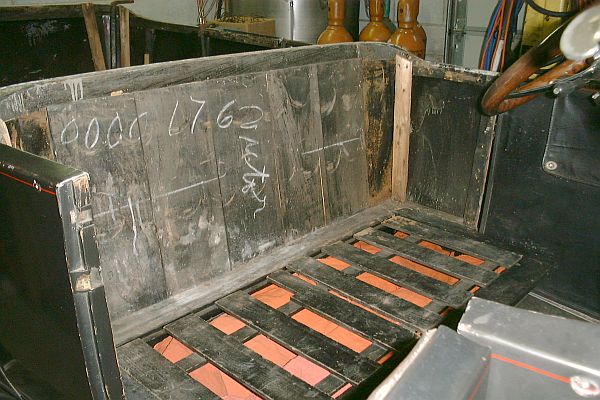
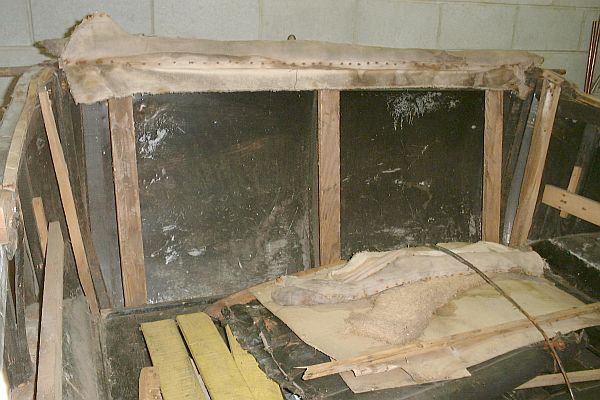
Stanley purchased their bodies from Currier Cameron Company and Shields Carriage Company. Currier Cameron made up the wooden body framework and covered it with aluminum. The body would then be shipped to Shields for installation of seats and side leather. The finished assembly would then be shipped to Stanley where it would be placed on the finished (and test driven) car chassis and secured in place with eight carriage bolts. The 0000176 drawn in chalk is stamped in various pieces of the wooden panels and structure identifying the body. There doesn't appear to be any relationship between the car's body number and its serial number (18137). In the picture above the "picket fence" boards that support the seat cushions can be seen. These panels were replaced with solid panels during restoration. The red cloth under the panel is to keep trash and dirt from falling into the area around the pilot fuel tank and the steam cylinder oil tank both of which are located under the front seats. Under the seats at the left of the picture would be the pump box.
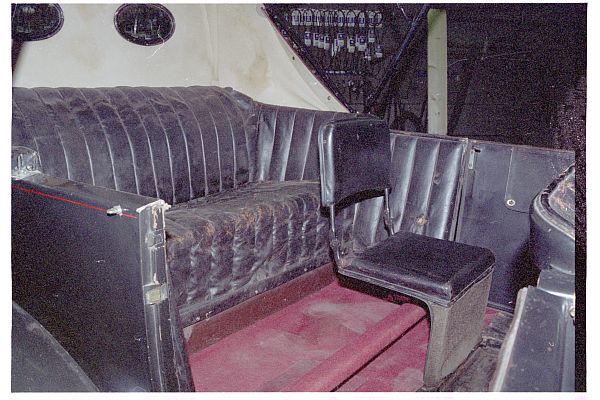
The rear seat area wasn't much different than what was found for the front seat area. The rear seat back however was only held in place along the top perimeter of the body. If the seat cushion were removed the box spring unit for the seat back would drop down and out from under the leather seat covering. A storage space is provided under the rear seat for tools so access is required on occasion. The car's lead-acid battery is also located in the storage area. The red indoor-outdoor carpet was added installed by Marvin Klair when the original carpet became unserviceable. A sample of the original carpet is seen on on the lower front of the jump-seat.
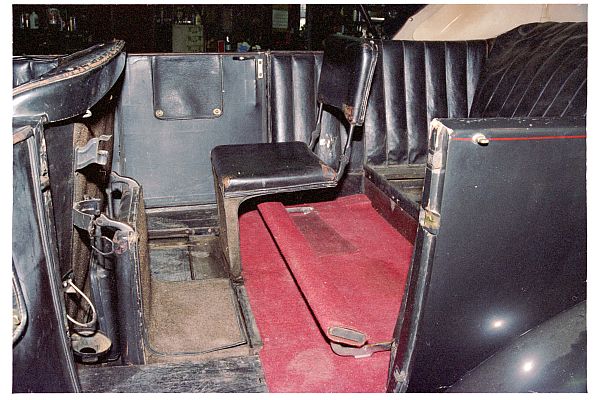
The photo above shows the rear jump-seat area through the left rear passenger door. This photo shows how the two jump seats are stowed (foreground) or set up for use. It wasn't until the jump-seat was disassembled that it was discovered that the seat backs are adjustable and have four inches of vertical motion. Once the seat is moved to the upright position the seat back can be pulled up to provide better back support. It was apparent from soon after the car was purchased that the jump-seats should not be used due to the condition of the single oak plank upon which they were mounted. The plank was cracked and the screws that secured it had stripped out in their holes. Restoration would require the mounting lumber be replaced. Americans were much lighter weight in the early 1900s and while Stanley never indicated a weight limit for the jump-seat, after restoration a weight limit is now in effect.
With the seat back, side panels, and seat cushion removed the wooden frame of the car can be seen. The body is constructed on an oak frame 1" thick by 4" wide. Oak posts which are cut to the body's contour rise from the frame and are interconnected around the top perimeter of the body by additional oak members. The aluminum skin of the body was then shaped and attached to the upper perimeter oak supports and the lower frame. Examination of the inside surface of the rear aluminum panel shows that it is a continuous panel from the right rear passenger door all the way around to the left rear passenger door. Once assembled all interior surfaces were painted flat black and the exterior was painted either a standard color (Royal Green for 1918) or any Valentine's Valspar Automotive Enamel color the customer had requested. This work was accomplished by Currier Cameron Company of Amesbury, Massachusetts. The unpainted lumber in the photograph above was installed by the Shields Carriage Company as their trim shop installed the interior within the body after. The rear seat back box spring rested against the three unpainted vertical wood supports at the rear of the car. To either side, and over the insets for the wheels, were additional support pieces for the side panels. The side support pieces were covered with a thick industrial paper type cardboard and the side leather covering applied over the cardboard just as was done for the front seat.
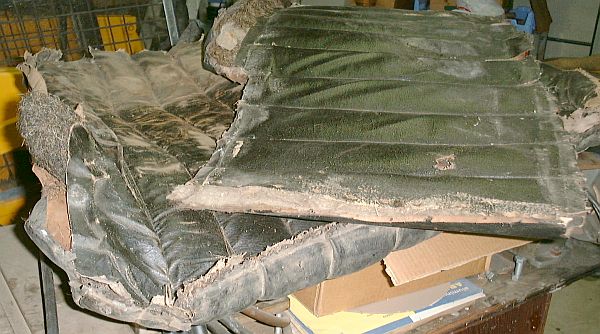
Resting on the work table in the above photograph is one of the rear side panels and the rear seat back. At the center left is some of the horsehair coming out of the edge of the back seat cover. The horsehair is sticking out between the leather outer surface (side the panel is resting on) and the black canvas rear panel. The canvas was sewn to the leather on approximately a 3-1/2" spacing and the space between stitch lines packed with horsehair. Across the center of the picture is the edge of a side panel and the felt can be seen between the leather (side the panel is resting on) and the black canvas used to make the back surface of the panel.
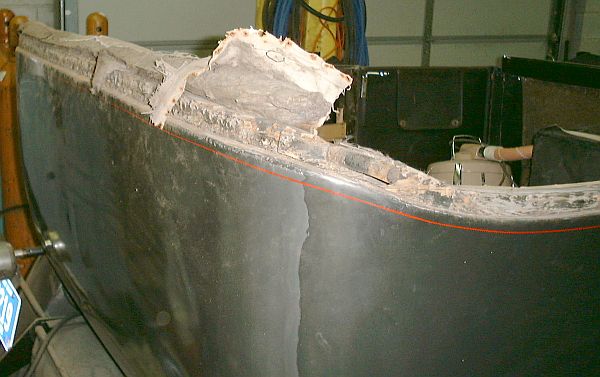
Along the top perimeter edge of the body Shields had installed a wooden nailer strip. That strip is shown in the above photo. The side panel leather and the rear seat back leather was formed over the nailer strip and tacked adjacent to the aluminum body of the car. The top was then tacked to the nailing strip to hold it in place. Finally a decorative trim was applied at the edge of the aluminum body to hide the edges of canvas and leather. When the car was restored in 1950-1952 the top and interior leather definitely had to be removed. The wooden strips were screwed in place so it is likely they were removed as well and then reused. The initial tacking of the duck cloth covering of the box spring followed by the tacking of the leather seat covering and finally the top material filled the wooden nailer strip with plenty of holes. Taking all this apart in 1950 and then putting it back in 1952 added another round of tack holes to the nailer strip. Add in the effects of age and water damage and what remained was more akin to Swiss Cheese. These parts were carefully removed and stored in 2000 so that they could serve as templates for the making of replacements. However, somewhere along the line this important collection of wooden parts found their way elsewhere. By late 2004 they were declared the first and only "lost" parts during the entire restoration process. Luckily the picture above and a couple others were available so that these wooden nailing strips could be remade from scratch. The above photograph doesn't quite depict the complexity of the pieces. The car's body is flat over the wheel well but just past the wheel the body both curves inward to make the sweep across the back of the automobile as well as rises up making the run across the rear of the car about 6" higher than the sides of the car. To make matters more complicated the right side curve (shown in the photograph) is a mirror image of the left side curve. Shields used a combination of steam bending and a minor amount of lamination to accomplish the contour. The replacements were cut from laminated blocks of flat stock that could be cut in a band saw to the rough contour of the body. The use of a disk sander and belt sander allowed the cut blocks to be contour fit to the body outline before being painted and screwed in place. |

