|
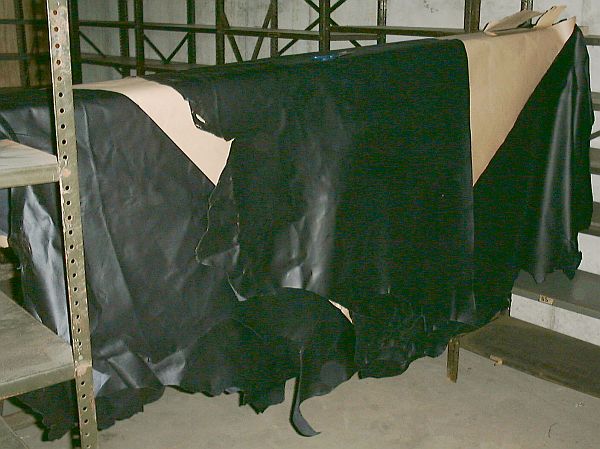
Samples of the seat leather were taken to Bill Hirsch Automotive Products in Newark, New Jersey where an exact match for the leather was found. The leather is referred to as Black Short Grain Landau (A-8500LB). 250 square feet or approximately 5 skins would be needed to cover the seats, side panels, doors, and other interior areas. Above the leather hangs from a cardboard tube before being cut into the widths and sizes needed for the interior restoration effort. Matching the carpet proved a bit more difficult. An exact match to the texture and color was not available. The next closest match was a Dark Brown Wilton III Carpet (615-X). 3.5 yards of the 48" wide carpet was purchased for covering the jump-seats, backside of the front seat, and rear floor area of the car. A matching brown thin leather binding would be used to trim the carpet edges.
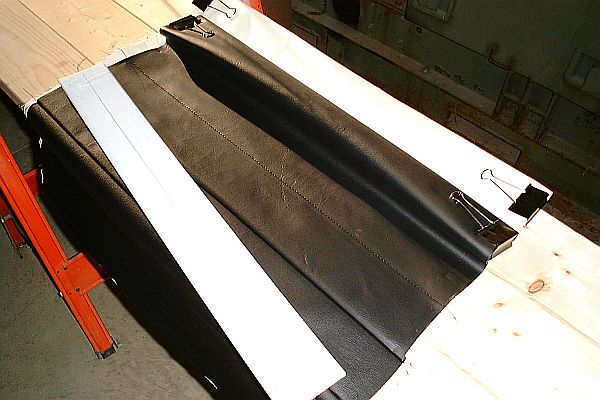
Once the leather was in hand and an industrial sewing machine (Singer Sewing Machine Model 111W153) had been borrowed for sewing up the car's leather parts the actual panels of leather that would cover the seats and sides of the car could be sewn up. The photograph above is of a partially sewn panel. The process started by cutting out a section of leather and a section of matching heavy duck cloth the size needed to cover a seat cushion or side panel. The two pieces of material were laid together and a double stitch was made along the edge binding the two as one. This would become the edge that will be tacked along an edge of a door frame or would be sewn to beading and a side panel to form a seat cushion cover.
A 3-1/4" wide piece of 1/4" thick plastic had one of its flat sides
taped with two strips of double-stick carpet tape. The double-stick tape
held the plastic to the leather so that the edge of the plastic could
serve as a guide for the sewing machine foot. The plastic guide was
slipped between the leather and duck cloth and up against the stitching
just completed. Using the plastic as a straight edge and guide for
the sewing machine's presser foot a stitch was sewn the width of the panel
effectively encasing the plastic between the leather and duck cloth and
forming a pocket the width of the leather. Once sewn the plastic
strip could be slid out either end of the pocket's opening. This is the same methodology was used to manufacture the original seat covers and interior side panels. While the original leather panels had most likely been sewn freehand which accounted for the varying widths of the panel pockets from 3-1/4" to 3-3/4" the use of the plastic template insured a more uniform end result. The process was repeated over and over again making the required number of pockets necessary for the panel to become a seat cushion, seat back, or side panel. If a panel was designated for a seat back or cushion it was also sewn lengthwise along one edge so that when it was stuffed with horsehair the horsehair would not fall out.
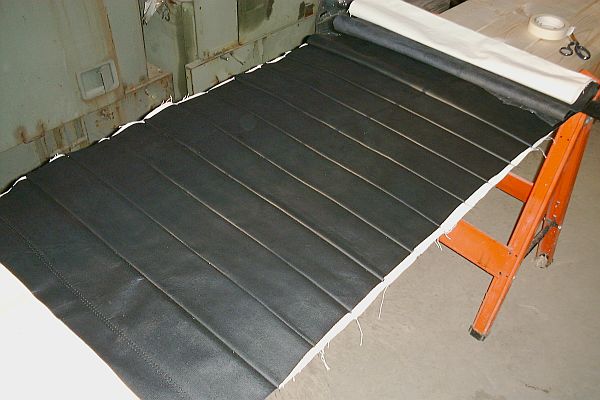
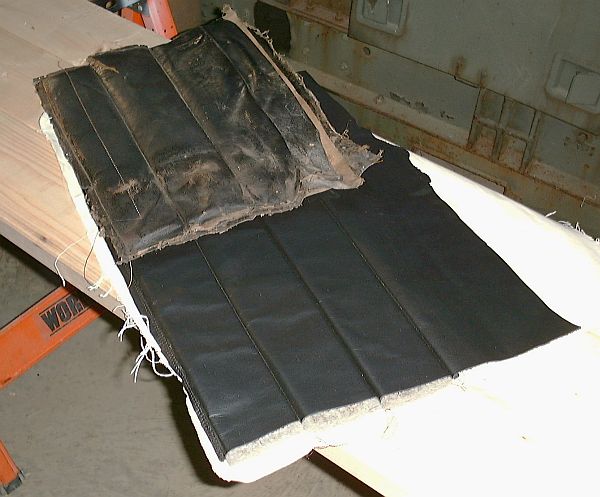
Pictured above is the leather panel that would eventually be used to cover the rear seat cushion. A total of nine leather panels had to be made. Three panels became seat cushion covers, two became seat back covers, and four became interior side panels. The remaining leather would be applied flat to fill panels at various locations in the interior or would be used to cover the doors.
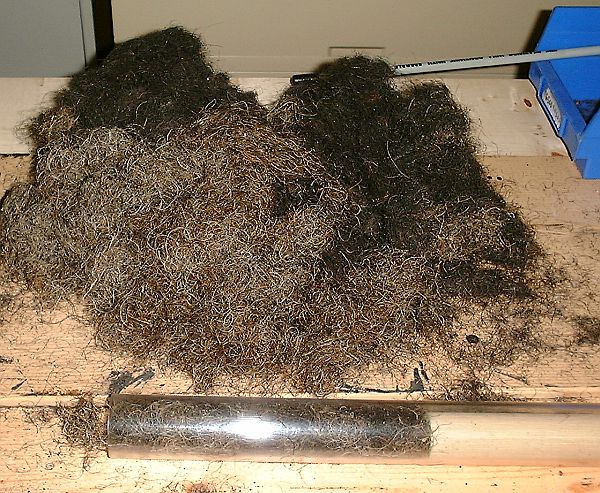
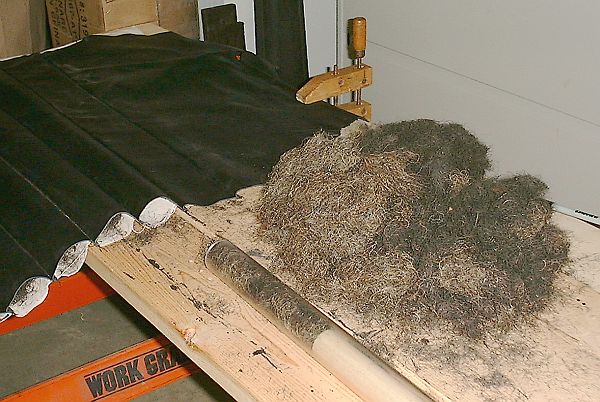
Stanley steamers generate a lot of heat during operation; every bit as much if not more than today's automobiles. An advantage of today's automobiles is the the bodies being well sealed to keep heat out and the use of insulation. The Stanley body is wood and very open in its design. As a result heat permeates up from under the car to reach the seats and eventually the passengers. Over the years various Stanley restorations have made use of modern foams and materials to replace the horsehair, felt, burlap, canvas, and duck cloth that was used in the construction of a Stanley interior. These materials have been found not to hold up over time as the heat breaks the materials down in a very short period of time. Thus there was no question that original Stanley materials would be used as much as possible for the restoration. Pictured above is a pile of horsehair ready for stuffing in a leather seat panel. The horsehair was removed from the original seat covers and combed back to a fluffy and resilient form for reuse in the seat covers. As some of the horsehair had been carried away by the animal inhabitants of the car and other amounts lost for various reasons it was necessary to procure additional material. By luck the horsehair from another Stanley was available and it was mixed in. In the photo above the piles of horsehair from various parts of the two cars has been loaded into a 1-1/2" diameter acrylic tube in preparation for "injection" into a leather panel pocket.
A leather panel's pocket was loaded with horsehair by filling an acrylic tube with 8 to 10 inches of horsehair. A 1-1/4" dowel was inserted in the plastic tube and served as the plunger. The tube and plunger was inserted into a pocket for as deep as necessary to contact the horsehair already inserted into the pocket. The wooden dowel was then held while the acrylic tube was slid up the dowel effectively leaving a slug of horsehair behind as the tube was retracted. The dowel and tube were then removed from the pocket, reloaded with horsehair, and the process repeated. Between each loading the horsehair was redistributed within the pocket simply by pressing on the outside of the leather panel and by occasionally using a 1/2" square stick with short nails sticking out to redistribute horsehair within a pocket. It is unknown if the same process was used in production by Shields Carriage Company but for the five panels necessary for this restoration the process worked just fine.
The remaining four leather panels designated for the interior side walls had to be stuffed with felt for padding. To stuff the panels 3/8" thick gray felt was cut in 3-1/4" wide strips the length of a panel pocket. Folded in half it was slid into the pocket made by the leather and duck cloth. Once through the pocket it was flattened out using a flat piece of plastic. As it was not entirely flat a wooden stick with a series of nails protruding through the stick was slid in the pocket so that it could grip the felt. Using the stick the felt was slid back and forth in the pocket. After sliding a felt strip back and forth several times it lay flat in the pocket. Pictured above is a finished, felt stuffed panel with the original panel resting on top for comparison. The panel pictured will eventually be attached to the front right interior side of the front seat. The deteriorated condition of the original panel is really obvious when directly compared to the replacement panel. |