|
Once the paint had been stripped from the car the areas of the body requiring major attention could be addressed. With the exception of the four wheel fenders, the rear of the car was without a doubt going to require the most attention. Two events had conspired to create heavy damage to the rear of the car. The previous owner, Marvin Klair, had been teaching one of his relatives how to drive the car. Unfortunately while turning the car around it was accidentally backed into a highway guardrail. The spare tire holder mountings were broken and a large dent occupied the right rear of the car. While largely repaired, the repair was a patch (of different paint color) of the existing paint and body. After paint stripping, the old body filler was sanded off. As the rear seat back springs and padding was gone permitting access to both sides of the aluminum, it was possible to hammer out the aluminum body and return the aluminum close to its original contours. This allowed the minimal use of body filler to complete the repair. The second event causing heavy damage to the car was the squirrels and mice that had made the rear of the car their home after Marvin had stopped operating the vehicle. Garages are never totally "crack free" and squirrels and mice had learned of the "Hotel Stanley" and it's heated garage. The rear seat back spring unit offered ideal living conditions. This area is dark, well insulated (horsehair, felt, burlap, and seat fiber), and little disturbed by humans. A number of animal families took advantage of these conditions from the assortment of oak nuts, walnuts, and other foodstuffs found when the rear seat back and sides were removed. What the area didn't provide was adequate bathroom facilities so the families used a little pocket area in the wood at the left rear of the car. The acids from the waste took their toll of the aluminum.
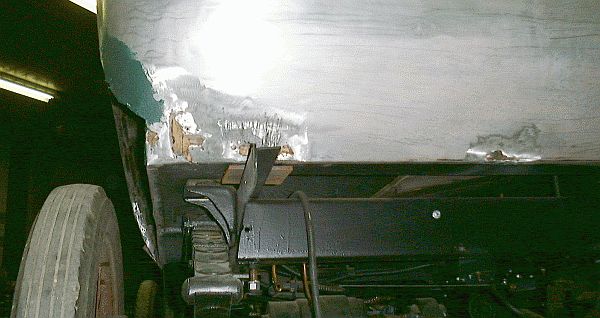
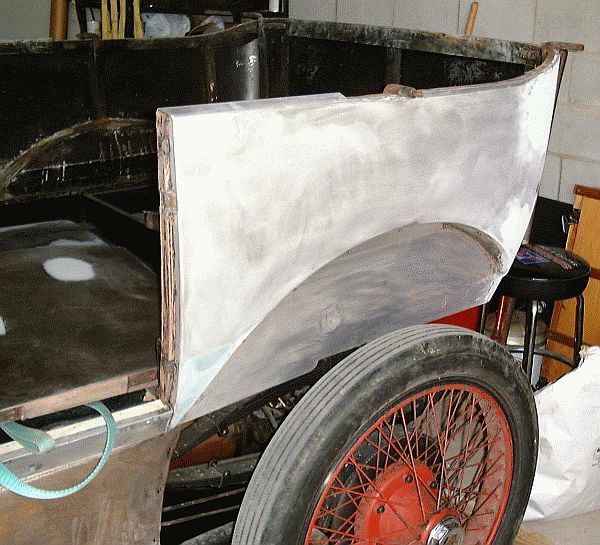
Pictured above is the right rear corner of the car showing missing sections of aluminum. The oak frame of the body can be seen though the missing aluminum areas. Stanley body construction started with a wooden frame assembled from oak. All of the body contours and shape are formed in the oak frame. The aluminum panels are then formed over the wooden frame and nailed to the oak. The oak frame is then set on the car's steel channel frame and bolted in place. There are pictures of the Stanley factory showing condensing cars mechanically assembled and waiting for their bodies to be bolted on. Stanleys were mechanically assembled and tested (even driven if need be) and then the body was lowered onto the frame, bolted in place, and the car finished for shipment. In the photo above the steel channel undercarriage of the car is plainly visible. The wooden body frame sits on the steel frame and is attached at six points using carriage bolts. The left rear angle bracket (with curved sides) used to attach the body to the undercarriage is shown above the elliptical spring. Close examination of the photo will reveal the aluminum body panel formed over the wooden frame (the aluminum extends over the wooden frame by 1/2" along the edge). The aluminum is fastened to the oak frame using short nails. The angle extending to the rear of the car (with the rusty steel plate on it supporting the body) is where the kerosene tank and spare tire brackets fasten. The dark green spot is a heavy fiberglass body filler applied to all of the cavities in the aluminum. The fiberglass filler provides bonding of the irregular edges of the aluminum to the oak frame underneath as well as building up the cavity to the contour of body.
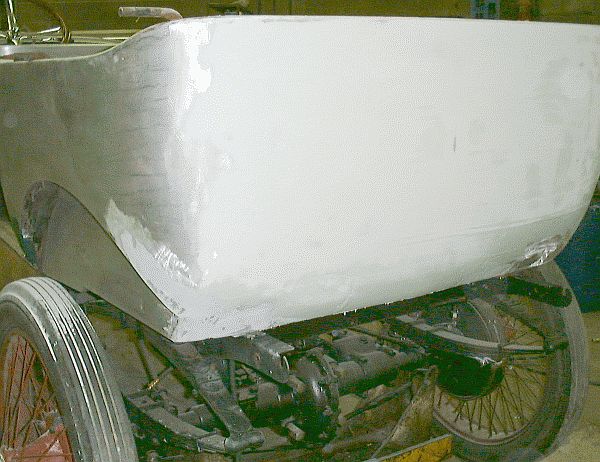
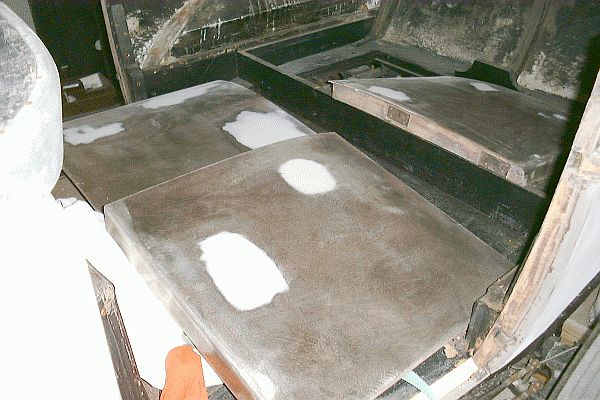
With access to both sides of the rear aluminum body panel, the crinkles and creases have been hammered out. This work reduced the amount of body filler required to only a thin top coat. The darker areas in the above photograph are where a heavier layer of body filler exists over the few remaining low areas in the aluminum. Once the fiberglass filler in the cavities had cured and was sanded to the rough contour of the body the entire rear of the car was covered with body filler. This filler was sanded and then additional coats applied as necessary to achieve the original natural curves of the body.
Multiple coats of body filler were applied to the rear of the car and sanded. As each layer was applied it was extended beyond the previous layer until the body filler wrapped around the full rear of the car. This insured that the rear of the car would appear smooth and contoured like the original rear of the car. With the rear of the car covered in body filler it is difficult to see the continuous curves and overall shape of the rear of the car. This is where an experienced eye and hand is required to make the body filler only fill the low spots in the metal and not change the overall contour of the body.
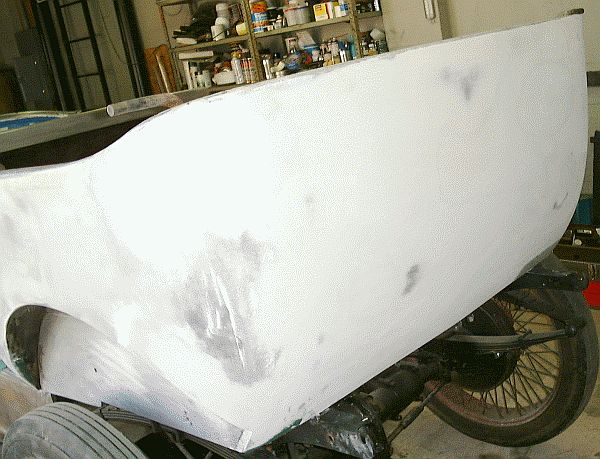
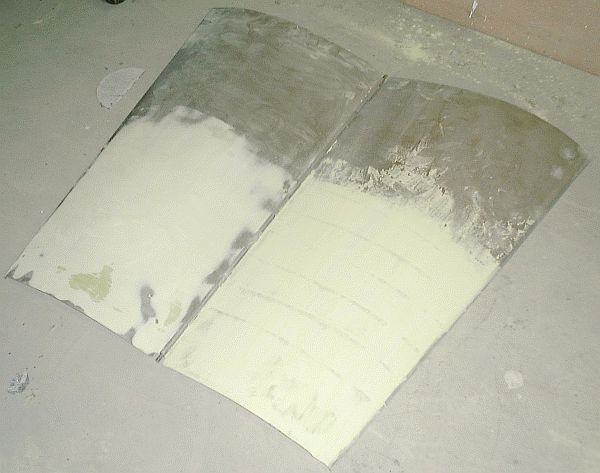
The photograph above shows the right rear corner of the car and another perspective of the repairs made. The photograph was taken after several layers of body filler had been applied and sanded. One of the results of the car's age was that the aluminum panels had developed fine cavities on their surfaces. As these cavities had body filler in them it indicated that the original Stanley paint had not held up well and that the paint had lost adhesion and allowed moisture and air to attack the aluminum. The body filler was removed from the cavities and all of the aluminum panels were heavily power sanded to insure all oxidation and any loose material was removed before the panels were primed.
The second worst area on the car's body was at the left rear passenger door. The oak wood frame had been exposed to moisture and had rotted. This allowed the oak vertical support for the body to not have the support it originally did. With passengers grabbing the top of the body for support as they entered and exited the car the body deformed. This allowed the aluminum panel to come loose at the triangular area just in front of the wheel well. This condition also meant that the rear doors did not close properly and had developed 1" gaps at their rear edges with the car's body. This problem was corrected in several ways. A 3/8" steel rod was installed between the left and right wheel wells to pull the two sides of the car back into alignment. The original steel brace that supported the vertical oak frame member was bent back to position and then modified with the welding of a steel gusset at the elbow of the brace. This greatly strengthened both of the rear sides of the car. These corrections now allowed the rear doors to close and align properly with the body.
The only steel body parts on the car are the four hood panels, the four wheel fenders, and the four doors. All four doors are different. All of the doors are constructed with steel panels attached to oak frames. The hinges are hidden in the door frame and body jamb. There are no handles on the doors with the door release lever located at the top inside rear of the each door. The rear doors are larger than the front doors and all four doors have different contours. The steel door panels were in excellent condition with only a couple of minor dents needing attention. In the above photograph the doors are sitting in the rear of the car awaiting primer. Careful examination of the photograph will reveal the small craters in the steel where the original Stanley paint had allowed moisture and air to rust the panels. Heavy power sanding just before priming would remove any remaining body filler and rust. At the right edge of the photograph the wrapping of the aluminum body panel over the oak vertical frame member can be seen. Across from it, at the upper left corner of the photo, the steel bracket that supports the side of the body at the door is shown.
The hood panels, in particular the top mated pair of panels, were in poor condition. The panels were heavily pitted with rust. Both panels have flat steel braces on the underside which had broken loose of their steel panels and had to be welded back into position after being straightened. The panels had several dents that had to be hammered out and sometime in the life of the car something heavy had rested on the car's hood such that the panels had a dip in them that had to be removed. A piano style hinge between the top two panels had three of the loop segments at the rear (two on one panel and one on the remaining panel) broken loose. The hinge is formed from the steel of the panel and probably due to lack of lubrication the steel hinge rod and steel hinge loop and rusted causing friction. With repeated openings and closings the steel hinge loops fatigued at their 90-degree attachment to the hood panel and broke loose. The broken hinge loops as well as several others that were cracked were welded to repair the damage. During the final installation all three hinge pins (each side panel is hinged to their respective top panel) was changed to polished stainless steel and well lubricated to eliminate the problem in the future.
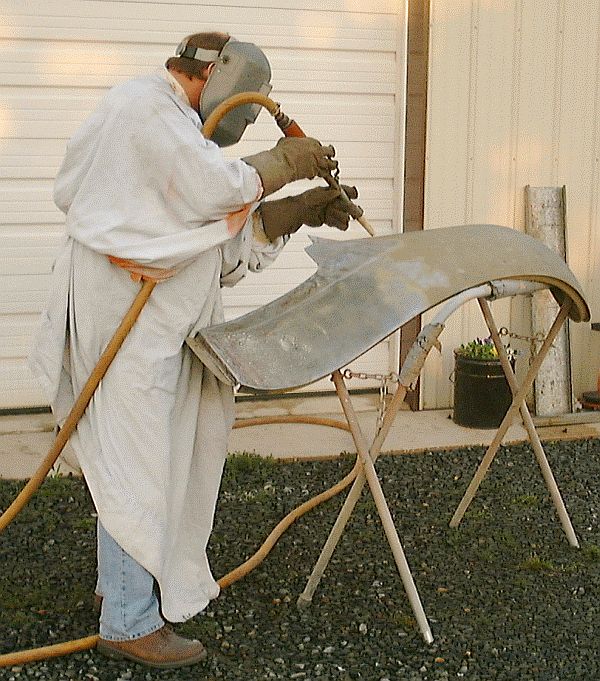
The four steel wheel fenders were in assorted condition. All were heavily rusted and in the case of the front right fender the rust had actually punched through the steel. Once the paint had been removed the only way to really clean the panels was to sandblast them. Pictured above, Carl Kishbaugh sandblasts the front right wheel fender. Once sandblasted some of the steel was so thin on this fender and the front left wheel fender that both had to be repaired with the addition of steel welded to the fender at the rusted through areas. The right rear wheel fender had been damaged when the car was accidentally backed into the guard rail and had to be twisted back into shape and the dents hammered out. Only the left rear wheel fender was in reasonable condition and did not require extensive repairs. With all the fenders repaired they went though a sequence of body filling with fiberglass body filler to hide the deeper imperfections. Once cured and sanded the fenders received multiple coats of body filler and sanding. Once the initial body repairs were complete the car was now ready for priming. While the car's body parts looked great, the application of etching primer and filler-primer would uncover imperfections that would require additional attention. |