|
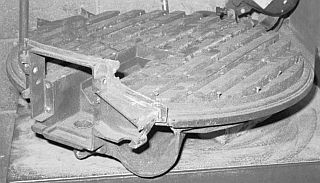
The Burner Casting During Restoration With the sheet metal removed from the burner casting the process of restoration could begin. Around the circumference of the burner casting were tapped holes that had the screws which held the sheet metal burner shell in place. These were ground smooth and new holes drilled and tapped. Stainless steel screws and lots of Never-Seize would insure the sheet metal shell could be removed from the casting. One thing that was going to be difficult to provide a drawing of was how to accurately cut the inner and outer sheet metal walls of the burner shell to mate with the opening provided for pilot access. The details of the pilot access opening had to be indicated on the drawings and the opening information had to take into account the radius of the wall as part of the calculations. The large square opening in the photo at the lower left is where the pilot is inserted in the burner. In the end the drawings provided a rough guide to the opening’s details however a light cardboard template was made and cut to exactly fit the pilot opening. The template was then used to provide the final cutting information for the two walls of the burner shell. Not seen in this photograph is the hardware that holds the pilot and main burner nozzle in place. These cast parts were also badly deteriorated. Part of the burner restoration was to fabricate replacements out of blocks of stainless steel. |